Using the Tryton Desktop Client
Tryton is a desktop client application, which means we need to know the server url and the port to connect to it. We also need to know the database that we are going to work on. There is also the possibility of creating a new database if needed.
Getting the Tryton Desktop Client
The desktop client can be downloaded from the downloads page of the Tryton website.
Warning
To be able to connect to a server you must use a client version of the same series as server. So if your server is series 3.0 you must use 3.0 series client.
Connecting to your server
The first time you open the Tryton client you will see the following screen.
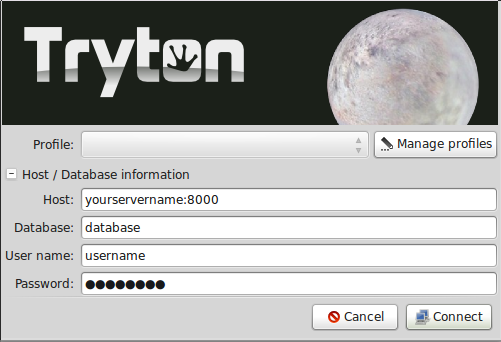
Tryton’s client login window
In this window you can enter the connection parameters of your server:
- yourserver: It’s your server URL. Something like demo.tryton.org
- port: It’s the port where your server is running. The default value is 8000
- database: It’s the name of the database you will work on.
- user: Introduce the username you want to use for connecting.
- password: Introduce your password to connect to the server.
Managing profiles
The Tryton client has the ability of managing connection profiles, so you only have to introduce the details of the server only one time. If you click the Manage Profiles button you will see the following screen:

Tryton connection profiles.
In the left part of the screen, you will see all the available profiles. You can add a new one by using the Add button. You can also delete old profiles with the Remove button. Use the right part of the screen to modify current profiles or to add the details of new created profiles.
The client will try to connect to the server to load the databases. It will fail if you can’t connect to the server.
You can open the Tryton client numerous times. This is useful when you need to access diferent servers or databases at the same time.
Password window
For security reasons the client will ask you to enter your password, if your screen has been inactive for some time.
Client options
You can customize the behaviour of your client by selecting the options menu. The most common options are:
Toolbar: Used to change the toolbar view. You can select to show only icons, only text and text and icons. The default value will show only icons.
Form: Used to change the view of the Tryton client. The following options are available:
- Save Width/Height: If marked, the client will remember the width of the columns if you modify it.
- Save Tree Status: If marked, the client will remember the opened nodes in tree view.
- Tabs positions: You can define where the forms tabs are shown. Possible values are: Top, Left, Right, Bottom.
Search Limit: Used to change the number of records the client will search for. The default value is 1000.
Email: You can introduce the command that will be executed when you use the send report by email option.
Toolbar options
In every Tryton tab the following toolbar option is available.

You can change toolbar view, just go to “option” on the top of the screen and select the toolbar options and select one from the following:
- Default
- Text and icons
- Icons
- Text
Text and icon view can be seen below:

Toolbar icons
They are distributed in four groups:
- Edition: Used to edit records.
- Navigation: Used to navigate through the records.
- Action: Used to interact with the records.
- Report: Used to generate reports.
In the Edition group the following icons are available (in order):
- New: Used to create a new record.
- Save: Used to save changes in the current record. If you haven’t changed the current record it will be disabled.
- Switch: Used to switch the current view of the data.
- Reload: Used to refresh the data.
In the Navigation group the following icons are available (in order):
- Previous: Go to previous record.
- Next: Go to next record.
In the Action group the following icons are available (in order):
- Attachment: Used to show attachments of the records.
- Action: Used to perform some action on the selected records.
- Relate: Used to navigate to relate info of the record. For instance, if you’re on a Party record you can use this button to show all the invoices related to this party.
In the Report group the following icons are available (in order):
- Report: Generate a report and show it on the screen.
- Email: Will generate a report and open your email client to send it.
- Print: Print a report directly on a printer.
Searching
A query is composed to search clauses. A clause is composed of a field name (with : at the end), an operator and a value. The field name is optional and defaults to the record name. The operator is also optional and defaults to a case insensitive search on the name of the record.
Examples:
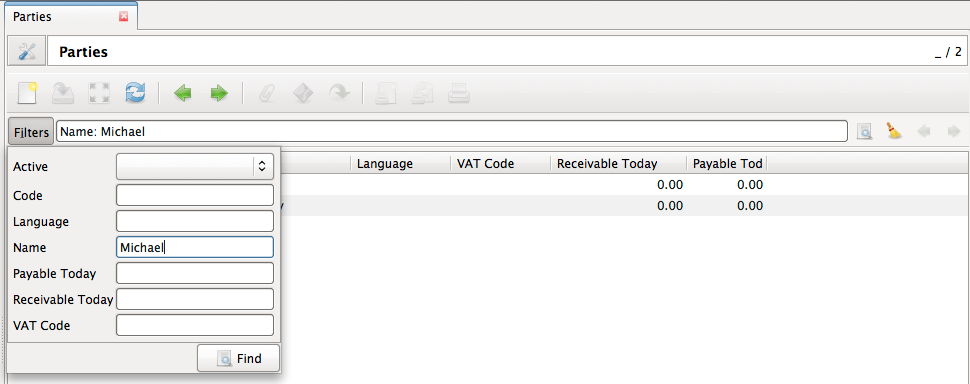
mich
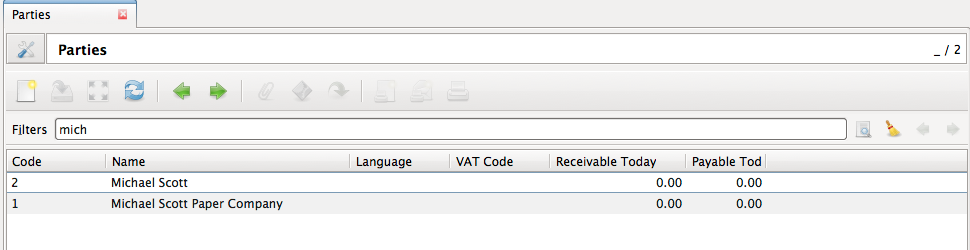
Name: Michael
Operators
The following operators can be used:
- =: equal to
- <: less then
- <=: less then or equal to
- >: greater then
- >=: greater then or equal to
- !=: not equal
- !: not equal or not like (depending of the type of field)
For example: Name: != Dwight
Wildcards
There are two wildcards:
%: matches any string of zero or more characters

‘_’: matches any single character

It is possible to escape special characters in values by using double quotes. For example: Name: “Michael:Scott” Here it will search with the value Michael:Scott.
Clause composition
The clauses can be composed using the two boolean operators and and or. By default, there is an implicit and between each clause if no operator is specified.
For example:
Name: Michael Amount: 100
is the same as:
Name: Michael and Amount: 100
Example using or
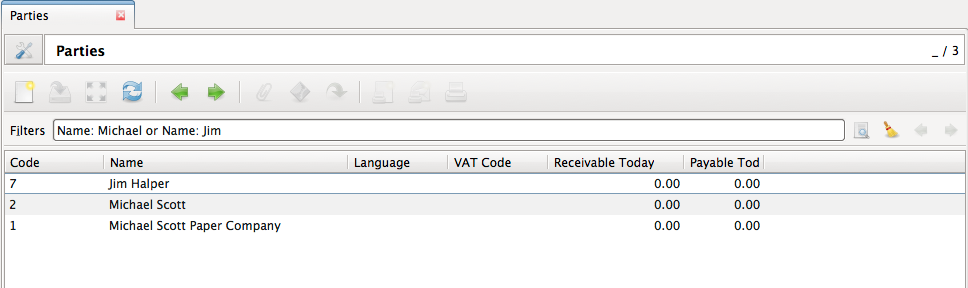
The and operator has a highest precedence than “or” but you can change it by using parenthesis.
For example:
(Name: Michael or Name: Pam) and Amount: 100
is different than:
Name: Michael or Name: Pam and Amount: 100
which is evaluated as:
Name: Michael or (Name: Pam and Amount: 100)
Tips and Tricks
- Refresh button: If you want to discard your changes on a record you can use the refresh button to reload server values.
- Favorites: You can save you favorites menu options by clicking on their star. Your favorites will be shown in the Favorites menu of the client.
- Global search: The text box in the top of the menu option is used to perform a text search on all global search enabled models. You can also access the global search by typing Ctrl+K from any place of the Tryton client
- Saving searches
- Hide the menu
- Right clicking on tree view
Attachments
On Tryton you can add attachments to any record. You can use the clip icon to attach some documents in a record.
The clip icon will show you yellow mark if the record has attachments.