Database management
Install a database of your choice. Here Posgres database is taken as sample database. Steps for installing Postgres can be found from Postgres Installation Install the database and give a new password to the postgres database user.
Creating Database
TODO
Upgrading a Database
To upgrade the database there are 2 ways to do that:
- By typing the command:
$ trytond -c ../etc/trytond.conf -u module_name -d database_name
- By using tryton client and connecting with your database.
- On left bar Under Modules > Modules. There you will see the modules installed on your tryton client along with the modules that are not in installed state. You can simply click on Mark for Installation for the module you wish to install and then click on Launch action to Perform Pending Installation/Upgrade. All the modules that you mark for installation will be installed.
Installing Modules
Each tryton database can be customized depending on the modules that are installed on it. A module is set of files that adds new functionalities to a tryton database.
A module can do one (or more) of the following things:
- Create new models
- Create new fields on existing models
- Create new views
- Modify existing views
To install a new module you can go to the Administration/Modules menú which contains a list of all the available modules on the server. To install a new module, you can push the Mark for install button. When you have finished selecting all the modules you want to install, you must use the Action button on the toolbar to launch the Perform Pending Installation/Upgrade wizard.
Once the wizard is finished, the new modules should be available on your database.
Warning
Some modules add new groups, so in order to see their options you will have to modifiy your user to add it to the newly added groups.
Uninstalling Modules
Although tryton has the option to uninstall a module on a database, occasionally it might not work as expected, as is still in the beta status. We recomend you to avoid uninstalling modules as much as possible.
If you want to test a module, you can install it on a test database and then install it on the production database if that module fits your needs. If you need some data to test your module you can create a copy of your production database and restore it with a diferent name.
Backup & Restore
The Tryton client allows you to create and restore backup of your databases.
To backup/restore databases, you will need the admin_passwd that was configured on your server. The default value for this password is admin.
Backup a database
Open your Tryton client and go to File/Databases/Backup Database. You will see a screen, which will display the following details:
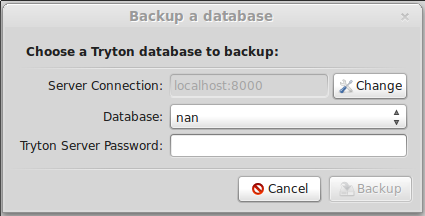
Tryton’s client backup option
Once you have selected one database from your Tryton server and entered the admin password the backup will be triggered. When the backup finishes, you will be asked to select a folder to save the backup.
All the backups generated with the client can also be restored by the client.
Restore a database
To restore a backup generated with the tryton client you must open your Tryton client and go to File/Databases/Restore Database. You will be prometed to entenr the name of the backup file you want to restore. Once the name is entered, you will see a screen which displays the following details:
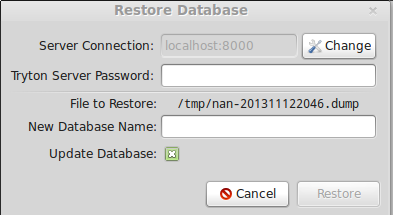
Tryton’s client restored option
You must enter your server password and the database name to the new restored database.
If you don’t want to upgrade the database after restoring you must unselect the Update Database option. We encourage you to keep this option selected as it is always a good idea to update your database after restoring.